文件上传下载
文件上传
一、文件上传介绍
文件上传,也称为upload,是将本地图片、视频、音频等文件上传到服务器,供其他用户浏览或者下载的过程
文件上传时,对页面的form表单有如下要求:
method="post"采用post方式提交数据enctype="multipart/form-data"采用multipart格式上传文件type="file"使用input的file控件上传
举例
1 | <form method="post" action="/common/upload" enctype="multipart/form-data"> |
服务端要接收客户端页面上传的文件,通常会使用Apache的两个插件
commons-fileuploadcommons-io
Spring框架在spring-web包中对文件上传进行了封装,大大简化了服务端代码,我们只需要在Controller的方法中声明一个MultipartFile类型的参数即可接收上传的文件,例如:
1 | /** |
二、文件下载介绍
文件下载,也称为download,是指将文件从服务器传输到本地计算机的过程
通过浏览器进行文件下载,通常有两种表现形式:
- 以附件形式下载,弹出保存对话框,将文件保存到指定磁盘目录
- 直接在浏览器中打开
通过浏览器进行文件下载,本质上就是服务端将文件以流的形式写回浏览器的过程
三、文件上传接收代码实现
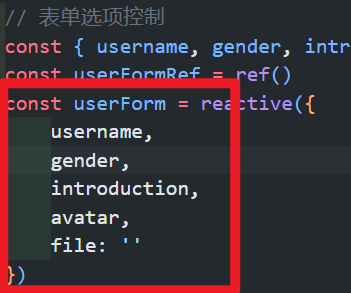
前端数据方法代码
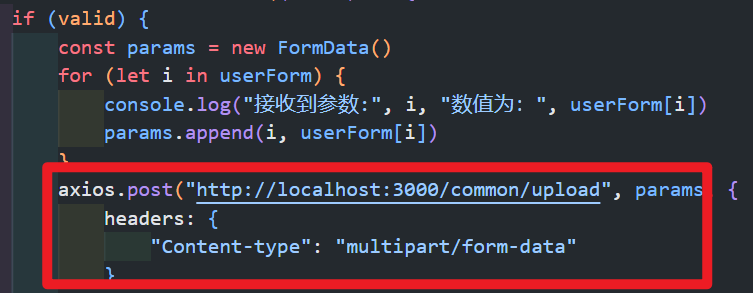
- 此处调用axios向接口:
http://localhost:3000/common/upload发送了表单数据设置表头header为Content-type:multipar/form-data,数据包含:username:字符串类型gender:字符串类型introduction:字符串类型avatar:字符串类型file:文件类型


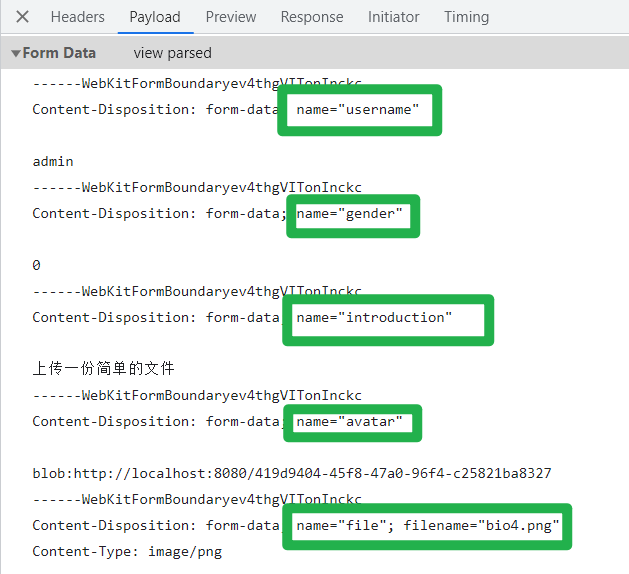
- 打开调试工具查看发送的表单数据,观察发送数据的
name

后端接口代码实现
- 第一种写法:
接口的参数对应表单数据的各项name,文件类型使用MultipartFile接收,若接口参数名与前端发送数据的name一致的时候可以不使用注解@RequestParam对应
1 | //打印日志 |
- 第二种写法:
考虑到需要接收的表单数据比较到,直接将所有参数写在接口上会显得代码比较繁琐,因此创建一个DTO来封装数据
创建UploadDTO类
1
2
3
4
5
6
7
8
9
10//对所有的数据创建getter和setter
//无参构造函数
//有参构造函数
public class UploadDTO implements Serializable {
private String username;
private int gender;
private String introduction;
private String avatar;
private MultipartFile file;
}使用DTO接收参数
1
2
3
4
5
public Result<String> upload(UploadDTO user){
log.info(user.getFile().toString());
return Result.success("接收到上传的数据");
}
四、将上传的文件保存在本地
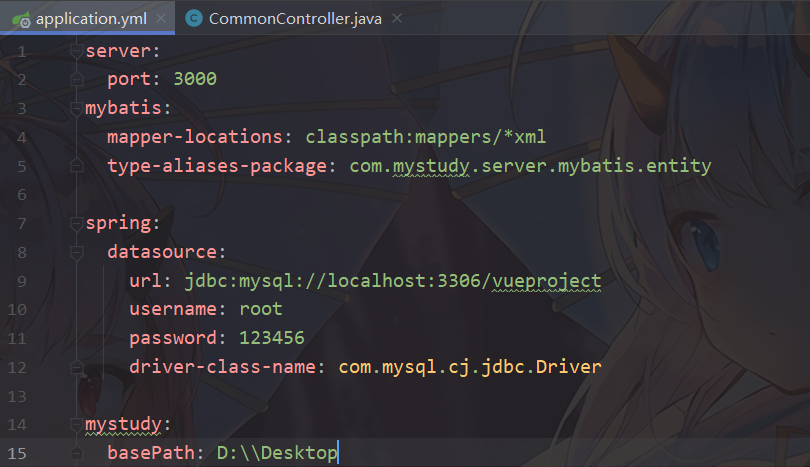
在配置文件中配置本地的路径,此处我的配置文件为
application.yml,设置了基本路径为D:\\Desktop
使用注解
@Value接收配置文件的数据,并使用UUID生存随机种子(保证文件名唯一),将上传文件保存到本地1
2
3
4
5
6
7
8
9
10
11
12
13
14
15
16
17
18
19
20
21
22
23
24
25
26
27
28
29
30
31
public class CommonController {
//@Value接收配置项数据
private String basePath;
//此处DTO对象描述看上文
public Result<String> upload(UploadDTO user){
//file是一个零时文件,需要转存到指定位置,否则本次请求完成后文件会删除
try {
//获取源文件的文件名字
String originalFilename = user.getFile().getOriginalFilename();
//获取源文件的后缀
String extension = originalFilename.substring(originalFilename.lastIndexOf("."));
//根据UUID生成的随机数加上源文件的后缀名生成新的文件名[唯一不重复]
String newName = UUID.randomUUID().toString() + extension;
//创建一个目录对象
File dir = new File(basePath);
//判断当前目录是否存在
if(!dir.exists()) dir.mkdirs();
//将临时文件转存到指定位置
user.getFile().transferTo(new File(basePath+ newName));
} catch (Exception e) {
log.error("文件上传失败:{}",e);
return Result.error("文件上传失败...");
}
return Result.success("成功接收上传数据");
}}
五、配置文件上传选项
- 在SpringBoot中,文件上传,默认单个文件允许最大大小为
1M.如果需要上传大文件,则进行如下配置
1 | # 打开application.yml配置文件 |
六、文件上传阿里云OSS
第一步:导入依赖
官方文档地址:在这里
- 首先导入阿里云的依赖【Java 9版本以上】
1 | <dependency> |
第二步:创建数据配置类
现在
application.yml文件中写入数据1
2
3
4
5
6aliyun:
oss:
endpoint: 桶子归属地域
bucketName: 桶子的名字
accessKeyId: 自己OSS桶子的accessKeyId
accessKeySecret: 自己桶子的accessKeySecret创建配置类
AliOssProperties1
2
3
4
5
6
7
8
9//为类添加getter/setter
//交给IOC管理
//将上述前缀为aliyun.oss配置数据匹配
public class AliOssProperties {
private String endpoint;
private String bucketName;
private String accessKeyId;
private String accessKeySecret;
}创建实现对象
AliOssUtil1
2
3
4
5
6
7
8
9
10
11
12
13
14
15
16
17
18
19
20
21
22
23
24
25
26
27
28
29
30
31
32
33
34
35
36
37
38
39
40
41
42
43
44
45
46
47
public class AliOssUtil {
private String endpoint;
private String accessKeyId;
private String accessKeySecret;
private String bucketName;
public String upload(byte[] bytes,String objectName) {
OSS ossClient = new OSSClientBuilder().build(endpoint, accessKeyId, accessKeySecret);
try {
PutObjectRequest putObjectRequest = new PutObjectRequest(bucketName, objectName, new ByteArrayInputStream(bytes));
PutObjectResult putObjectResult = ossClient.putObject(putObjectRequest);
} catch (OSSException oe) {
System.out.println("Caught an OSSException, which means your request made it to OSS, "
+ "but was rejected with an error response for some reason.");
System.out.println("Error Message:" + oe.getErrorMessage());
System.out.println("Error Code:" + oe.getErrorCode());
System.out.println("Request ID:" + oe.getRequestId());
System.out.println("Host ID:" + oe.getHostId());
} catch (ClientException ce) {
System.out.println("Caught an ClientException, which means the client encountered "
+ "a serious internal problem while trying to communicate with OSS, "
+ "such as not being able to access the network.");
System.out.println("Error Message:" + ce.getMessage());
} finally {
if (ossClient != null) {
ossClient.shutdown();
}
}
//文件访问路径规则 https://BucketName.Endpoint/ObjectName
StringBuilder stringBuilder = new StringBuilder("https://");
stringBuilder
.append(bucketName)
.append(".")
.append(endpoint)
.append("/")
.append(objectName);
log.info("文件上传到:{}", stringBuilder.toString());
return stringBuilder.toString();
}
}创建实现对象的”工厂”
OSSConfiguration1
2
3
4
5
6
7
8
9
10
11
12
13
14
public class OSSConfiguration {
public AliOssUtil aliOssUtil(AliOssProperties aliOssProperties){
log.info("开始创建阿里云上传工具类对象:{}",aliOssProperties);
return new AliOssUtil(aliOssProperties.getEndpoint(),
aliOssProperties.getAccessKeyId(),
aliOssProperties.getAccessKeySecret(),
aliOssProperties.getBucketName());
}
}
第三步:后端接口代码实现
1 | /** |
- 标题: 文件上传下载
- 作者: 忘记中二的少年
- 创建于 : 2023-10-04 12:00:00
- 更新于 : 2023-10-05 20:25:36
- 链接: https://github.com/HandsomeXianc/HandsomeXianc.github.io/2023/10/04/文件上传下载/
- 版权声明: 本文章采用 CC BY-NC-SA 4.0 进行许可。
